Ascriptica is deployed with several standard roles. However, you have the ability to create your own roles and permissions to provide specific access to a certain group of users.
How do I create a custom role?
Sample use case:
- I would like to give a specific group of users access to the enrollment tool only. All the other admin tools should not be accessible.
Instructions:
- First, log into Ascriptica
- Click on tools
- Expand the tools sub section and click on Roles and Permission
- Click Add to begin the process
- Provide the name of the role and a description that help users understand what the role will have access to.
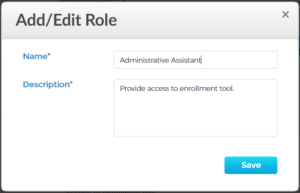
- Click save
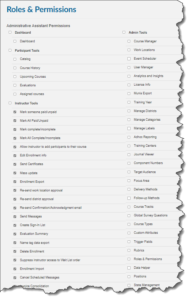
- Select the areas of the system the role should have access to
- Click Submit.
How do I update/change the permission of an existing role?
Sample use case:
- I created a new role; however, we found out that we provided too much access and I need to restrict access even further.
Instructions:
- First, log into Ascriptica
- Click on tools
- Expand the tools sub section and click on Roles and Permission
- Search for the custom role
- Click on the gear icon to change the access. Toggle off the checkbox to remove and toggle on the checkbox to add new permissions.

- Note: Click the pencil icon to change the name and description
- Click submit to save your changes
How do I assign a custom role to a user?
Sample use case:
- I would like to give a specific group of users access to the enrollment tool only. All the other admin tools should not be accessible.
Instructions:
- First, log into Ascriptica
- Click on tools
- Expand the tools sub section and click on User Manager
- Use the filters to find the user
- Click the pencil icon to make changes to the user
- Click on the role page
- Click Add Role
- Select the role from the list and click submit
- Click next to save the change
Video: Creating and assigning custom roles