Custom attributes provide a way to extend course listings. No matter how we try there is always a unique case requiring an additional piece of information to be captured for each course. Custom attributes provide you with a way to create your own additional fields. These custom fields once created become available in the following areas:
- During the creation of a course
- Viewing a course in the course catalog
- During the registration process
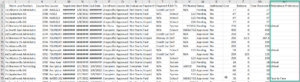
- Adhoc Report
- Enrollment Export
- Available in templates that provide access to course information
How do I create a custom field?
Sample use cases:
- I would like to make registrants know if we are providing stipends for the course
- I would like to display a unique course number defined internally.
- I would like to display a piece of information about the course that is not currently collected by Ascriptica natively.
Instructions:
- First, log into Ascriptica
- Click on tools
- Expand the tools sub section and click on Custom Attribute
- Click Add to begin the process
- Select the field type, determine if the field is mandatory, and if you would like the field to be defaulted
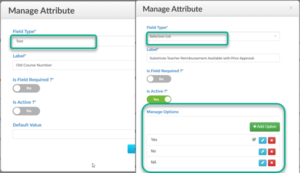
- Click save.
How do I setup a custom attribute to prompt the registrant during the registration process based on rules?
Sample use cases:
- I would like to prompt the registrant that form#2240 is required if substitute teacher reimbursement is available for this course.
Instructions:
- See section How do I create a custom attribute for how to create a new custom attribute and use “selection list” as the field type.
- Click on “Add Rules” to create a new rule
- Select the value you would like the rule to be triggered on as shown below and turn on the alert toggle to indicate the text you would like to show/prompt during the registration process:
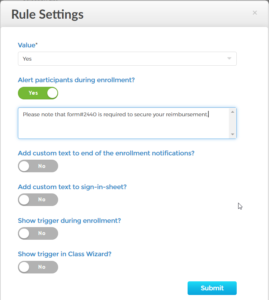
- Click submit
- Click submit again to save the custom attribute.
How do I show a custom field based on another custom field’s content?
Sample use cases:
- For some courses I would like to get the registrant’s attendance preference.
Instructions:
This will be accomplished in 2 parts.
Part#1: Create the custom attribute that will prompt the user to make the selection so the information can be stored in the enrollment record. This will be a special custom attribute called a trigger field because it is only displayed when triggered.
Part#2: Create the custom attribute that provides the user creating courses the option to determine if the course supports the trigger or note. Example: In our sample use case not all courses would provide the option of virtual or in person. We would only want to prompt users when it is relevant to the course.
Part #1: Create the trigger field/attribute
- First, log into Ascriptica
- Click on tools
- Expand the tools sub section and click on Trigger Fields
- Click Add to begin the process
- Select the field type, determine if the field is mandatory, and if you would like the field to be defaulted. For our sample use case you please use the selection list because you want the user to make a selection as shown below:
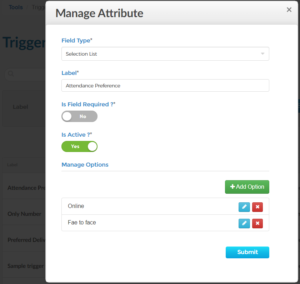
- Click Submit to save
Part #2: Create the custom attribute that provides the user creating courses the option to determine if the course supports the trigger or note. Without this step the trigger will not work.
- See section “How do I create a custom attribute” for how to create a new custom attribute and use “selection list” as the field type.
- Click on “Add Rules” to create a new rule
- Select the value you would like the rule to be triggered on, and the field you would like to trigger/display to the user. Please note that the field you select is the trigger you created in part#1.
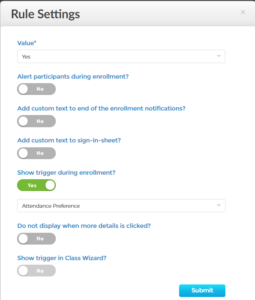
- Click submit
- Click submit again to save the custom attribute.
How do I include custom fields in the enrollment export?
- First, log into Ascriptica
- Click on tools
- Open Ad hoc Reporting
- Select the training years and filters you want
- Click Export to XLS
- The exported file will automatically contain the field and data